Independent Study Pitch:
Photoreal Compositing;
Nuke and Maya 2017
continued from last TRI:
Reasoning:
Phil’s feedback, more emphasis on the output to be an outstanding showreel level quality that’ll impress, building on from the techniques from last TRI.
More work on Modelling (ergo photoreal modelling) which was also Phil’s feedback
Learning Arnold Rendering engine as Melbourne VFX standard
Ability to help complete some testing and research in association with capstone project.
Means:
Using already established techniques
Online tutorials
Output:
Creation of 2 or 3 end to end VFX shots by end of TRI using each of the necessary Junior based skillsets.
Showreel pieces for further Internships or Junior roles
Developing more knowledge within Nuke and Maya
Concept terrain generation:
For a baseline for Alessandro during week 3 to complete the terrain mapping.

rough stage 1 of it. Using plane and sculpting toolset within Maya.
This was to make a rabbit guideline, of what would actually need to exist within the pipeline so we don’t spend time on things that are not required.

Creating the entrance to the burrow, there wasn’t enough topology to create necessary deformations to the mesh.
Used smooth to create more polys.

Top view of the basic map, which is a general roadmap. There would be extensions to the scene as to create more space and to attribute to the state of the short film.
It’s only a baseline for Alex to create work off. The gulley is shown on the left.

Finished concept, no trees in the cylinder ports. Hasn’t been low poly deformed but still looks nice.
This work was completed on the Monday before the class.

An image of some nice level compositing level I’d like to do for my shot during my Independent Study this TRI, maybe with something more similar, but still to this extent, it’s a good level for a showreel.
Tuesday:
During class we completed a lot of work, and divyd up the roles, which was a solid distribution with a large emphasis of work on the art team. I wanted to project the early phase hard so it would snowball through the rest of the project.
Stalling would not be of assistance, and would be a strong detterance on peoples will during class.
We also did a bit on Arnold, which was helpful. During my MASH grass tests I did a bit of Arnold physical sky so I knew a fair amount of it, but as always there was some nice tricks and hints hinted through it which were helpful. I took screenshots as a recording for future myself.
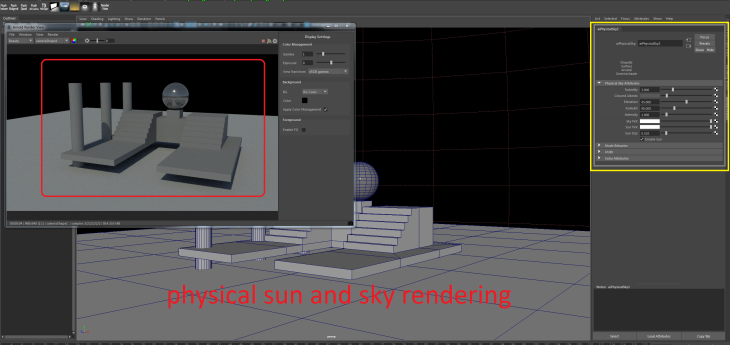
Attribute editor to change up the certain dimensions of the PS as shown down further below.
Lots of customisation within this section alone.
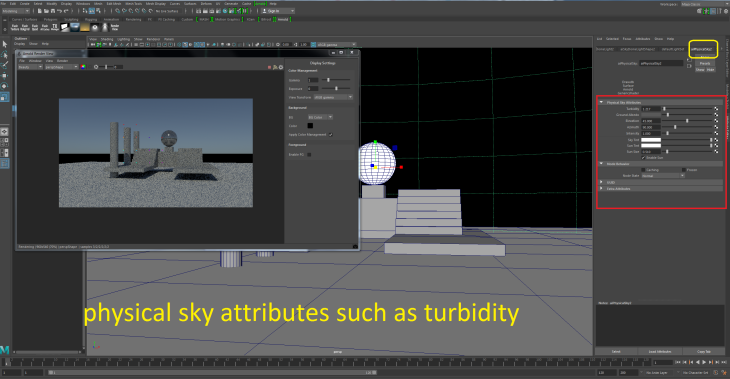
Playing around with them in class, they all offer a lot, and things such as the sky tint also offer strong emotional colour, which can help set the scene. As Nigel always said, never have anything at 0 or 100.

A good thing Phil mentioned, which I was unaware of.
These were the kinds of things that are handy but unaware of. It’s a handy trick or else you’ll be using too much of the render power up without any usage in times that are not needed.

Base scene with physical sun

Creating an expression through the environment tab, similar to mental ray is the best way to optimise it.
Phil said not to keep it on while batch rendering however.
We also played with HDRI’s in class, which I copied over to use for myself.
Shader Tests:
Started creating a paper shade within Maya. I’ve never made a shader, so this is completely new terrain for me. There’s a lot to learn in Maya’s nodal system.
I followed an average c4d style tutorial, but wanted to optimise way further then that. My current test was on a 8 sided sphere, as Phil recommended
This was testing 01.
All are simply IPR renders as it’s easier to push out tests in this manner.

Just using this for test 01 as it was in style, and would accentuate what I was going for.

Within all online sources, people discovered that the aiS backlight scalar is an important aspect of the shader development as it allows for directional sun effects. This is shown further below in more tests.

Using colour temperature soften the edges of the shader way too much, and you couldn’t define the verts on the shape, which is important to the visual design of the film.

Test 01 of the shader w backlight.
Using a physical sky just for natural lighting.

End of testing resulted in this. The plane is to show the backlight potential and some other properties of the shader.
Next test will involve the environment assets of Week2.
IBL Research Task:
Using this video as a nice reference for IBL.
IBL works off the colour theory.
Using this knowledge of scientific lighting, the reflection of specific colours in the colour spectrum gives the colour we see it as. This is a key aspect of IBL.
Refraction (both within life and Maya) is when the light breaks from whitelight and therefore breaks through into a wide range spectrum. Thing Pink Floyd album which is that exact image to represent it. 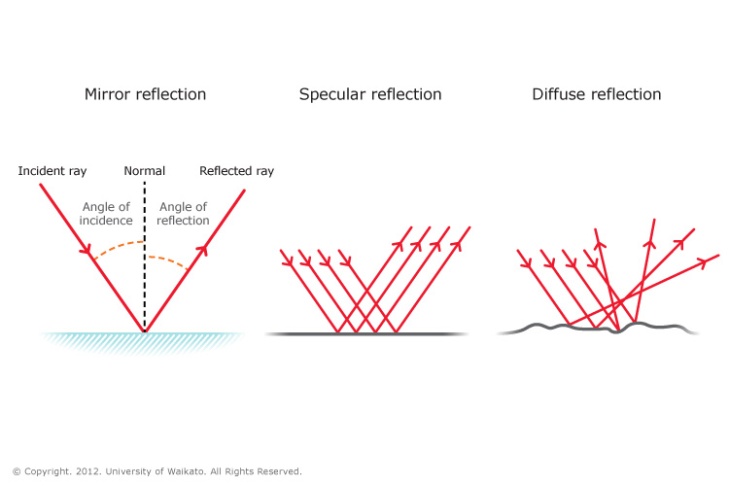
Assigning a colour value to a shader doesn’t give it colour. This is purely just the colour it reflects and is independently based on the interference of a light photon to reflect upon.
IBL found in same place.
Process:
Render settings (make sure default lighting is off, pretty sure it’s off already in Arnold2017)
Environment fall out tab, which is the same as the physical based sun and sky
You can select a file from the checkerboard and input a HDRI file
Pick it on the basis of what colours you would like reflected within the scene.
If the object shader is reflectivity=0, then no colour will be reflect ergo will be a black shape as the absence of light.
Must have a level of reflectivity within IBL pipeline.
Works in duality: Controls of the Image and the Object.
Base Setup
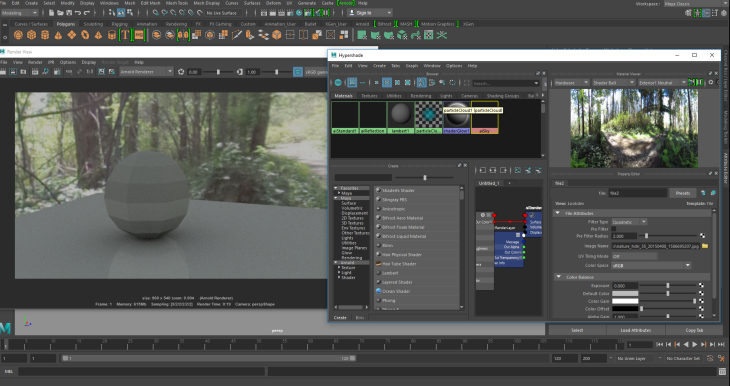
I used this to create some more tests within Maya, using a few different HDRI’s to see how much they can affect it without any changes to an aiS standard shader.
Below is the HDRI’s tested with.
Here shown below are the tests. I enabled the HDRI in the images so you could tell which was which,

A bit softer as a HDRI, there was less colour shown in general so it wasn’t as strong as the others. Might be nice as a hint.
Bit more natural and gives more green to the ball.

The strongest green of them all, a bit more hazy style of green however and didn’t seem to be crisp in general.
Shown below is some lighting reference, and how we could apply it within the film. More research needs to be done with HDRI and our shader, but it’ll continue in the week.


More HDRI and Paper Shaders as well as an issue:
Started doing more with the shader to bring it further.
I wanted to combine the two tasks and how they might interact. This was completed on the Thursday.
I still have things I want to do with the shader as it’s deffinatley not working how I want to look wise.

With the HDRI, you can either have it sRGB at 2.2 or raw from where it came out of the file node. Honestly raw sRGB felt better so I chose to use it.

IPR render of test 01
Below is some more development of tests, and creating more within the scene.
Occasionally playing with HDRI settings too.
Mainly adjusting the shader properties however.


After speaking to a Junior Lighting artist, he suggested playing around with more map data to achieve the look through normal, spec and colour.

Final render for the day before shower. Still a lot of issues. Need out colour to be more bland white, need more map data and need more facial based shading.
Obviously quality is low because of samples.
https://support.solidangle.com/display/AFMUG/AOVs
Started testing with new options.
Made a paper shader using a map in the Maya node system.
This involved the paper fold map as well as a bump2d system. I will be continuing this and furthering it through more systems of tests and attributions to the shader system.

This was a bit noisy so i wanted to change it a bit.
All my tests are on lowest samples for quick testing.
Using my dual monitors, you can see a bit more into my attributes.
This one below had too much contrast between shadows and the actual diffuse.

From this, i wanted to go into more soften colour, more plain white style.

Putting up the exposure did this, as well as changing some settings within diffuse tab, but this was too strong.

This is the map with no bump info between this and the one before it.
There’s clearly a large difference and it might be worth using bump maps on specific assets as it’ll increase the importance of features that need to be accentuated.

Using this, it seemed like a pretty good in between.
It had the attributes of regular paper but wasn’t too strong in either diffuse direction.
It’s getting closer from this point.
The normals are also an issue of worry.
Sunday Night Shader Testing

Obviously no HDRI, doesn’t matter because paper isn’t even reflective
Was just playing with colour details at this point

For some reason, all my shader tests were extremely white, and I wasn’t sure why this was happening. It was causing frustration because i thought I was getting mixed results from tests on saturday to tests on sunday.
I found out eventually what happened to cause this.

First test with assets. Got rid of bump map.
Talked with Dion on the best ways to approach the bump map situation.
On monday night i’ll try work with a fuller scene, and create full lighting for it and see just how it looks.
HDRI Research
http://adaptivesamples.com/2016/03/16/make-your-own-hdri/
Gave some interesting info on this website.

This is a good example of how HDRI images work. Their range of extension out of the scope where they are not clipped to a limit of 1 is extremely effective in situations like this.
The process of creating a HDRI:
Firstly, you’ll need some gear:
Most websites offer different options on how to do it, however most either mentioned-
. DSLR with a wide angle lens that’s less than 20mm
However some websites also offer the idea of using Lightroom to clean and stitch the HDRI’s together.
